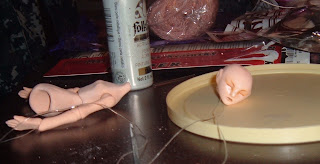
BJD-making has been on my mind for the past two years now, so yesterday I just up and decided to go for it. I found a good 5-10 different websites with various helps and thus spent the first hour stress-rubbing the clay through my hands. No step-by-step. No clear explanation.
Evetually I found the confidence to actually try. First I sketched the doll. (The only part of this sketch that I used was the face. lol) I used a round ball of foil for my doll's head, which was a pain but I'll explain that later. I made all of the body parts out of foil, but I only used the head.
I started with the calf-part of her legs. I shaped them and used my Sculpey needle tool thing to make a hole for stringing (Also a pain.) In retrospect, this worked incredibly well, but the holes weren't big enough to hold double strands of string.
I read on
Dolly Daydream that it's much easier to fit the joints to the ball than vice versa, so I made the balls next. Medium-sized ones for the knees and larger ones for the hips. I made the thighs next. I made the balls separate, because I figured I could just glue them on later. WRONG!
Make these parts together or it will be nearly impossible to string. The next day I wound up making another set of calves around a very small paintbrush stick (I'm sure a chopstick would work.), balls small enough to fit the knee holes that were already on my thighs. In the balls I made nice
big holes so that my string can get through both the calf AND the ball-joint.
I baked the calves and their joints, then fitted the thighs and joints and baked them.
After making the legs and their needed ball-joints, I made a torso, following the
Noah Doll Tutorial. After playing with the darned thing for a while, I tried the Dolly Daydream way, where the torso has two parts. This worked much better. I hollowed out two sections for hip sockets using the rounded Sculpey tool. On the other end of this tool is a blunt point tool that I used to poke holes through the top. I also used this tool to hollow out the top half.

Use the pieces as a guide for other pieces. I used the bottom to figure out how hollow the top had to be. Here also make sure you make the neck longish so it will fit in the head. Now that I think about it, I maybe could have baked the bottom half and then formed the top half around it as well... xDD
DON'T BAKE THE TOP HALF YET!!
I moved on to the head, which was very very hard. I'm not a great sculptor, so the face looks squashed and malformed, but yeah whatever. I didn't have any eyes, so I just made her face look peaceful with closed eyes.
To make the head, I rolled out the clay and wrapped it around the ball of foil. It is possible to use too much clay, so be careful. Leave a nice big hole at the bottom for the neck. (refer to Dolly daydream.)
When you've finished with your face, make sure you add ears and all the essentials. Then make a crease at least for an opening at the back of the head, or else it will be A) very hard to string, and B) very hard to get the foil out.

Next I made my arms and their joints. (separately, and I'm still kicking myself in the pants) I made nice little dents for the shoulders and made sure everything would fit.
Here is another
helpful tutorial.
Lastly I made my hands and feet. (oops) I should have started with these, for the fit-the-socket-around-the-ball rule. My hands look silly and flat, but they're hands.
For the feet, you're going to need some wire for loops or s-hooks (Not sure why, If anyone can explain, that would be much appreciated!) It helps with looping your string back through, I guess.
For hands I used
this tutorial.

After everything was baked, I realized that the foil was still in her head (ONOZ). So I grabbed my exacto knife, because I had forgotten to make the indentation and cut out a section of the head, so I had to do it now and pray that the head would not be ruined. Well, it worked, and I was able to get all of the foil out, after ten minutes of careful plying. BE CAREFUL! You do not want your clay to crack!


I went to the 100 Yen store and bought some "sanding sponges" because they had no sand paper! The sponges worked magnificently, though. Her skin is nice and smooth.
To thread her, I'm using some stretchy beading string. I used a regular bead inside the head instead of an S-hook.

I painted her head and I'm now working on a feather wig, since I'm too cheap to buy her a real wig.


I hope this was helpful!
Other Resources:
http://kathyoconnellsart.wordpress.com/2011/08/22/stringing-my-porcelain-ball-jointed-doll/
http://www.dollmaking.info/make-your-own-doll/restringing-a-ball-jointed-doll
http://www.desiredcreations.com/howTo_PJHands.htm
http://www.vivcore.com/dolly_daydream.html
http://www2d.biglobe.ne.jp/~dhnoah/make_00.htm
http://batchix.livejournal.com/826827.html
http://www.diynetwork.com/decorating/doll-wigging/index.html


